Installing WordPress on Ubuntu: A Step-by-Step Guide for Developers and Entrepreneurs
In this article, we’ll walk you through the process of installing WordPress on an Ubuntu server. By following these steps, you will be able to set up a robust, scalable WordPress environment tailored for your web projects.
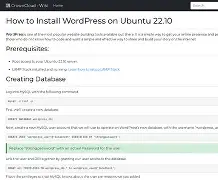
Preparing Your Ubuntu Server
- Update your server packages:
sudo apt update && sudo apt upgrade -y - Install the required packages:
sudo apt install mysql-server mysql-client php php-mysql apache2

Downloading and Extracting WordPress
Download the latest version of WordPress directly to your server using wget:
wget https://wordpress.org/latest.tar.gz
Extract the downloaded archive:
tar -xzvf latest.tar.gz
Configuring WordPress
Copy the WordPress files to your web root directory:
sudo mv wordpress/* /var/www/html/
Remove any existing content in /var/www/html:
sudo rm -rf /*
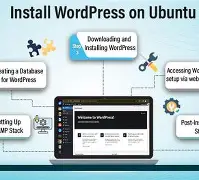
Finalizing Your WordPress Installation
Now that WordPress is installed, you can access it by navigating to your server’s IP address in a web browser. Follow the on-screen instructions to complete the setup process.
Congratulations! You have successfully installed WordPress on Ubuntu. Optimize your WordPress site for performance and SEO, and watch your online presence grow.